
After three weeks of adjustments to virtual models, 3D print testing, mentoring across offices, we now have our second round finalists’ prototypes! It has been rewarding to watch the growth of our staff and their fortitude in these three short weeks – they have wrestled with their designs, the printer output and final assembly. Each print had to be managed closely, and many valuable lessons were learned that will serve the firm well as we continue to master the art of 3D printing and bring three-dimensional options to our clients at every stage of design.
Designers of this 3D Design Challenge were encouraged to make prototypes, analyze both the expected and unexpected and make refinements to their model. This allowed for an iterative process, where the nuances of modeling for a 3D printer could be figured out, testing precision and the limitations of the machine. The firms Practice Leaders spent time to review process models and sketch out new ideas with the competitors to help provide a continuous level of design refinement. To further promote knowledge sharing each designer will be presenting to a firm wide audience, focusing on lessons learned and best practice with the 3D printer.
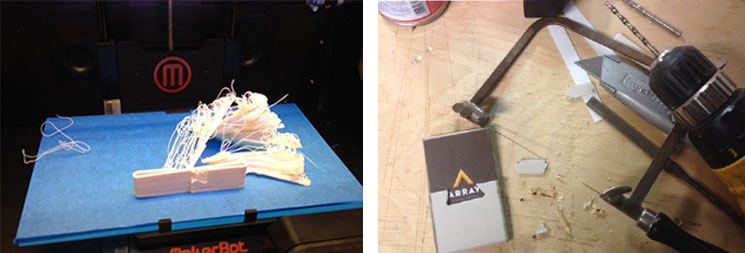
David Artman, Array project architect, experienced his initial print going off the track during the early print trials. According to Kent Doss, Dave’s Studio Director, “Mistakes aside, that’s actually kind of a beautiful mess.” On the right, Dave took his prototype home for some further finessing. [Caption] Cutting, drilling, and filing to study different alteration, I’m experimenting with the printed object then going back to the computer model and reprinting.

According to designer Julia Savastinuk, “I wanted to capture progressive movement and change with a dynamic model. Array is extending up and outward while maintaining a strong foundation, expressing change and growth. The cards, held in the ‘architects’ portion, are seen through the layers which peel off of the array logo.”

Designer Natalie Amodei discovered many nuances while managing her 3D printing process. She also was more than willing to share with her peers (competitors in this case) so each Array office would have someone who knew the ins and outs of the Makerbot. "At this point I had a good understanding of the mechanics of how the cardholder would hinge, and these sketches were a way of figuring out how to orient the separate models on the plate to get my desired outcome. Considering my model is two colors, I needed to figure out the sequence of how it would print and how the two colors would fit together. I was also struggling with how to get the same depth and variety in the clear diamond pattern that I was getting in previous prints, while maintaining void space to house the cards within. My previous models were coming out “chunkier” than I wanted, and these sketches led to the slim design that I ended up submitting."
Stay tuned for our final post on this first 3D Challenge, which will reveal our winning design and a hint at our next firm challenge. Did you miss the first installment? Don't miss out!
Blog written by Tony Caputo, former designer with Array Architects.